| < Previous page | Next page > |
Floodplain 2.0Floodplain Tool 2.0
Parameter Description: NetMap’s updated (Summer, 2019) floodplain/valley floor mapping tool (2.0) uses an improved algorithm that more accurately delineates variations in floodplain and valley floor morphologies, including identifying potential off-channel fish habitats (that may currently be disconnected), and other low-lying areas, such as potential wetlands.
The output polygons are provided by TerrainWorks in new (post spring, 2019) virtual watershed datasets and they also exist for older LiDAR and 10m-based NetMap datasets (contact us). You may also apply the new mapping tool with older datasets to create your own floodplain/valley floor map polygons, although adequate computer power is required, and it could take more than a day (e.g., run over the weekend)
This NetMap tool creates polygons (one for each increment of height above channel) depicting valley surface elevations relative to the channel, using either elevation in meters or increments of bankfull channel depths. The parameter is designed to delineate areas potentially prone to flooding (at varying levels and magnitudes), identify channel floodplain interactions including channel migration areas and avulsion potential, terraces (of varying elevations), alluvial (and debris flow) fans and associated off-channel habitats.
For additional information about how NetMap is used to map floodplains, see: http://netmapchallenges.blogspot.com/2018/03/mapping-valley-floor-landforms.html
Data Type: Polygons
Field Name: ChEl_datasetID; Common Name: Polygons of elevation (meters) above the channel.
Field Name: ChDep_datasetID; Common Name: Polygons of the number of channel depths above the channel.
Units: meters or number of bankfull depths (#)
NetMap Module/Tool: Fluvial Processes/Floodplain Mapping
Model Description: Channel centerline elevations are estimated from the DEM with channel elevation profiles smoothed by a linear fit over a moving centered window that varies in length. A distance-weighted mean of all channel elevations within a certain distance of each valley-floor point is calculated. Height above the channel is based on the distance-weighted mean elevation over a channel segment(s). For each DEM cell a minimum horizontal distance to a channel cell is defined, as shown in Figure 1 below. Then all channel cells within a certain multiple of that distance are identified. For example, using a multiple of 1.5 and the nearest channel location 20 meters from a valley-floor cell, all channel cells within a circle of radius 30 meters centered over the cell are tabulated. A weighted mean of the channel-cell elevations is then assigned to the valley-floor cell. Weighting is calculated as 1-D/R, where D is distance to the channel cell and R is the circle radius.
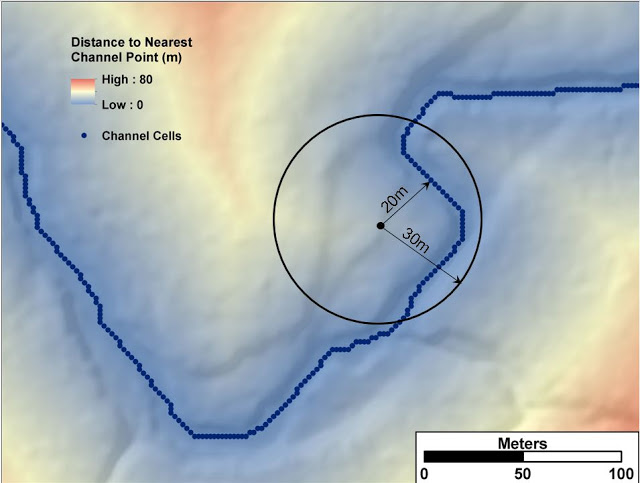 Figure 1. An illustration of the distance to nearest channel point.
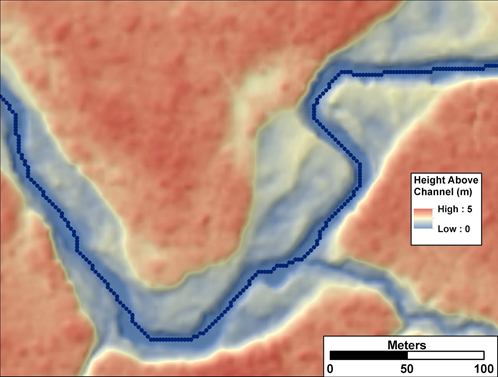 Figure 2. The height-above-channel in terms of absolute elevation.
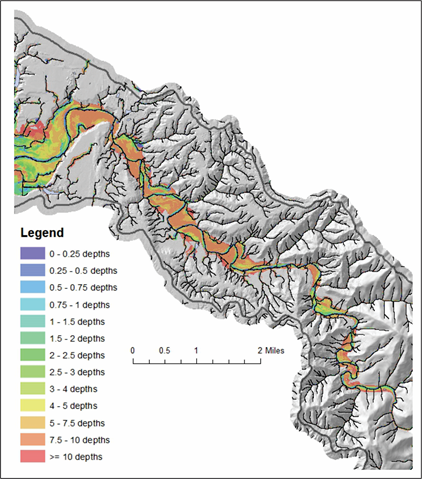 Figure 3. An example of floodplain and terrace mapping in the lower Elk River, Oregon Coast Range; < 1 depths = active channel, 1 - 3 depths = active floodplain, 4 depths = occassionally flooded, and > 4 depths = terraces. 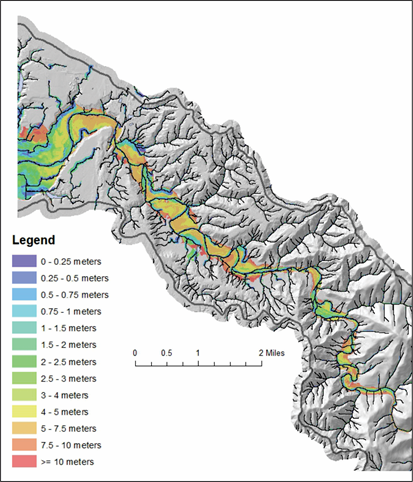 Figure 4. An example of floodplain and terrace mapping in the lower Elk River, Oregon Coast Range in absolute elevations.
USE OF THE TOOL
 Figure 5. Using Floodplain 2.0, one can (1) load both absolute elevation and height above in increments of bankfull depths (2). (3) all channel floodplains can be displayed or only the floodplain for a single channel (described below). (4) Floodplain width data can be placed within individual channel reaches, for use in other analyses.
 Figure 6. (upper) Showing floodplains for all channels. (lower) Showing floodplains for only a single channel (mainstem). Note: when displaying all floodplains there are overlapping data at tributary confluences. Showing ALL floodplains defaults to those of the larger drainage areas being shown at tributary confluencese. This means, that the larger tributary floodplain will supersede and potentially cover up the floodplains of smaller channels at confluences. When analyzing a single channel floodplain, it is recommended to view a single channel floodplain at any one time (Figure 5, #3); this requires identifying the channel ID (Figure 7). See Figure 8.
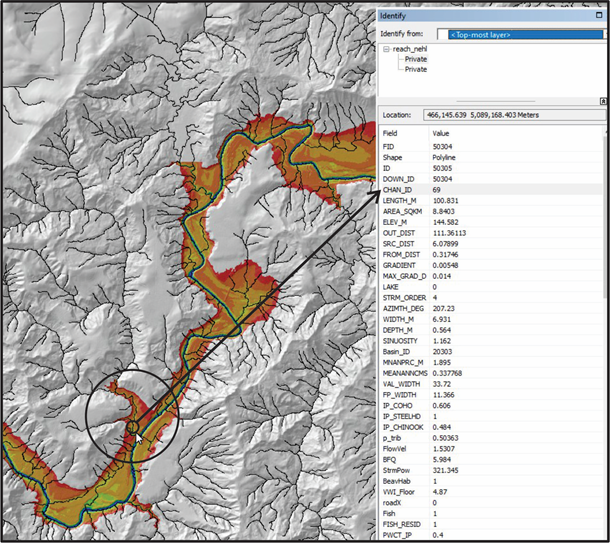 Figure 7. Use the ArcMap "i" tool and select a reach using the channel reach layer to identify the channel ID number, showing as #69 above as example. Use that number in #3, Figure 5 to display a single channel floodplain.
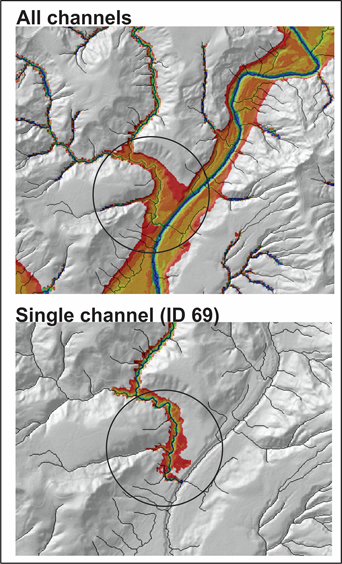 Figure 8. This shows the difference between viewing all channel floodplains (upper) compared to viewing only the smaller channel floodplain. Note the difference at the confluence. Using all channels, the larger channel floodplain can obscure the smaller channel floodplain.
|